Samples
LIMS | Samples

Samples are database entries analyzed on a kit plate, including standards, QCs, and study samples. Before creating a worklist, study samples must be registered, either individually for small sets or via batch import for larger studies.
- Register each sample only once in WebIDQ (e.g., pooled samples). Replicates can be linked across plates. WebIDQ distinguishes them by well position or injection number.
- Kit specific samples (calibration standards and QCs) are provided by biocrates, loaded via an OP. For more information see Kit specific OPs.
Sample types
WebIDQ identifies sample types by function with different icons. Users can create unknown samples and custom QCs while other types are provided by biocrates.
| Type | Icon |
|---|---|
| Blank | |
| Zero sample | |
| Calibration standard | |
| Quality control sample biocrates QC | |
| Quality control sample Custom QC | |
| Unknown sample |
Sample information
Additional metadata can be added to each unknown sample registered in the database via WebIDQ's built-in categories.
| Information | Description |
|---|---|
| Identifier | The sample name or ID. It will be shown in the plate report, worklist, and results table. |
| Material | Choose the sample matrix. (predefined list) |
| Species | Choose the sample species. (predefined list) |
| Contact | Enter a sample owner. Multiple contacts can be selected. (optional) |
| Org. info | Organization information. (optional) |
| Sample description | Enter a sample description. (optional) |
Extra information can be added for each sample by creating custom groups and variables, which is explained further down.
Individual sample registration

Under the Samples section, add a new sample +
Enter the required sample information and Save. Some fields can be searched by typing.
Custom QC registration

To benefit from features in Validation like CV calculation for QC samples, for example a study pool sample can be registered as custom QC.
Add target values | Custom QCs

Target values of a custom QC can be added.
- Select a custom QC.
- In the tab Target values, click +.
- To add metabolites of the used kit and LC-MS system, select the corresponding OP(s). See Kit specific OPs.
 Example for Quant 500 XL kit and SCIEX 5500 | UHPLCMXP500L-0-5513MXP500F-0-5513MXP500X-0-5511
 - Recommendation: Define target values for each metabolite in a CSV file, available from WebIDQ.

- Click Export to CSV.
- Open the exported CSV file "targetValues-1234567890.csv" and add target values. "1234567890" is the barcode of the custom QC.
- To update target values in WebIDQ, click Import from CSV.
Import sample list
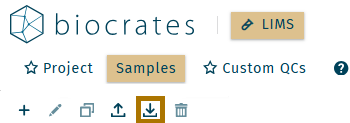
To import a batch of samples into the WebIDQ database, use the Import sample button ![]() .
.
In the popup window, drag a .csv or .txt formatted samples list onto upload box.
![]()
The sample list must be comma, semicolon, or tab delimited, with columns for all assigned categories.
At minimum, include sample IDs. Other details such as species and material can be defined as columns in the import file (useful for mixed imports) or applied globally to the entire batch once the file is loaded into WebIDQ.
Sample import format
| Sample ID | Material (optional) | Species (optional) | ... | User category (optional) |
|---|---|---|---|---|
| Sample 1 | plasma | human | ... | Group A |
| Sample 2 | plasma | human | ... | Group A |
| Sample 3 | plasma | human | ... | Group B |
| Sample 4 | plasma | human | ... | Group B |
Once WebIDQ finishes parsing the file, select which categories in the WebIDQ database correspond to which columns in the file using the dropdown menus (e.g. Sample Identification ⇾ Sample ID).
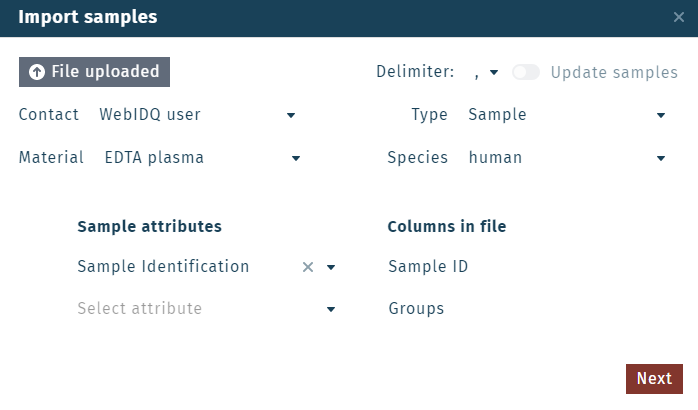
Other database categories or custom groups and variables can be also be assigned here, but are not required. Furthermore, not all columns from the imported file need to be assigned and can be left blank.
WebIDQ should automatically determine the correct format, otherwise, the delimeter can be manually adjusted in the import window.
Once all the required columns have been linked, click Next. In the subsequent window, confirm that the sample list is OK and then Store.
Once all samples for a study have been imported, the next step will be to generate the worklist.
Add information to study samples (unknowns)
- In LIMS > Samples select the corresponding samples. Example:

- Select the samples and click Export samples.

- Open the received CSV file. In this CSV file, add all desired sample information, e.g. the sample identifier and save the CSV file.

For more information, refer to the WebIDQ user manual, section Import sample list.
- In LIMS > Samples, import the CSV file with sample information from step 3.
- Click Import sample.

- Drop the CSV file into the field.

- Activate Update samples.

- Define all values and attributes according to section Import sample list.

- Click Next.
- Check the import and click Validate.
- If the validation was successful, click Store.
- Click Import sample.
- Sample information was updated.
Groups and variables | Metadata
Additional sample information can be added in LIMS, such as clinical data (disease state) or numerical details (age, treatment). This metadata will appear with the final results.
To add a new category, click the Add metadata at the bottom of the Samples section.
Click the + to add a new attribute.

Give the attribute a name and select a type. Categories are used for attributes with discrete groups. Date, number, and text can be used to add non-categorical metadata.
Define categories by adding individual group components. Select a categrory (e.g. "Category") and click the + in the side popup to add a new group.
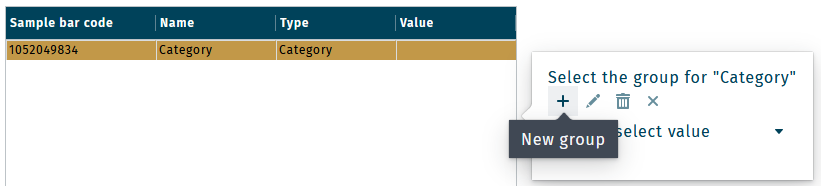
Keep clicking the + to add as many groups as required.
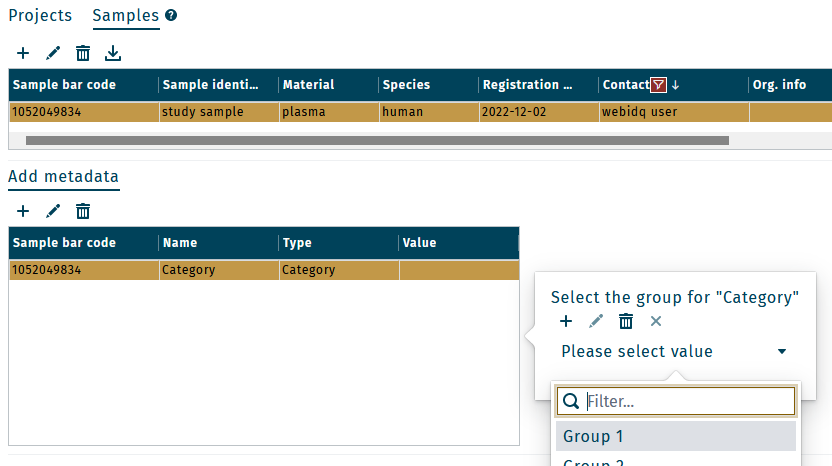
With a sample or group of samples selected in the sample list, use the dropdown menu to assign a group (e.g. "Category > "Group 1")
Tissue and cell factors
Tissue and cell factors can be defined for each sample. These values allow metabolite concentrations to be normalization to the amount of starting sample material before the metabolite extraction was performed.
For a more detailed description of Tissue factor and Cell number, see appendix.
In LIMS > Samples, select a single sample or multiple samples and click Tissue and cell factors at the bottom of the screen.

For tissue or samples extracted from a starting mass. Input the ratio of extraction solvent to sample mass as µL/mg in the Tissue factor field.
For cell samples, put the cell number in the Cell number field and the volume of extraction solvent used to lyse the cells in Cell extr. volume.
Later when exporting results, normalization to tissue factor or cell number can be performed in Results > Display options > Concentration unit.
The exact names of each column header do not matter (these will be manually linked with database categories in the import menu), but the content must match the names and syntax contained in the WebIDQ database.