Project | Features
Import plate run(s)
If a kit was run but the corresponding plate run is missing in WebIDQ use this feature, e.g. a plate run was accidentally deleted. The plate run is created based on the MS data of the measured kit.
- Select an existing submission or create a new one, e.g. "TQ-XS example kit".

- Click Import plate run(s).
")
- Drop the MS data of a plat run, e.g. WIFF or RAW files.

- Select the pipetting mode, the way how the kit was pipetted in the laboratory. Default is "Vertical".

- To create the plate run, click Import.

Example | Recreate kit plate layout with “Import plate run(s)”
If kit MS data was acquired with WebIDQ but the corresponding plate run(s) are not available in WebIDQ, as they were for example accidentally deleted, plate run(s) can be recreated by using the feature Import plate runs(s). For this procedure, MS data from the corresponding kit run is used.
- Select a submission, e.g. “YYYY-MM-DD_Quant 500 kit”.

- Click Import plate runs(s).
- Navigate to the MS data of the corresponding kit run(s) using the Windows File Explorer. Select MS data in the File Explorer and drop the files in WebIDQ into the field “Drop files here”. Folders containing MS data may be dropped.


- Select the pipetting mode used for kit plate preparation, “vertical” or “horizontal”, and click Import.
- Corresponding plate run(s) to the uploaded MS data was(were) created. Please find an example below.

To move plate runs between submissions, us the feature Move plate.
- Study samples (unknowns) were imported without sample information. Adding sample information is is described in section , refer to the next section Add information to study samples (unknowns).
Kit data quantification is described in section Quantification.
Create worklist features
This section describes features for generating a worklist.
Create a project
Click New project or +, if another project was selected.

In the pop up box, define a Project code and Project name.
| Option | Description |
|---|---|
| Project code | Prefix project's name |
| Project name | Suffic of project's name |
| Description | Additional information |
| Contacts | To link one or muliple contacts, Click +. To remove a contact, click x. |
| Project team | Define users with access to a project. To grant access to all users, leaving this field blank. |
Click Save.
Project team | project access restrictions
A user or user group can be granted with exclusive access to a specific project.
- Select a project,
- In the field Project team and select a user, e.g. biocrates Customer Support.
![]()
No user linked (field is empty): all users have access to a project.
Users with the WebIDQ role "admin" have access to all projects.
Create a submission
Create one submission per kit.
With a project selected create a submission by clicking New submission.

The submission is created in the selected project.

How to select samples
ⓘ Associated section → Create kit plate layout > 4. Select samples
Click Zeros and select a zero sample, from the top pane.
- Add three zero sample replicates, as shown below.
- For serum and plasma samples, select "PBS".
- To add a sample, click Select samples.


Click Cal Stds and select Calibration Standards of the kit.
E.g. for Quant 500 (XL) kit "Q500(XL)_Cal1" - "Q500(XL)_Cal7".
To select the multiple samples, keep Ctrl or Shift key pressed.

Click QCs and select Quality Controls of the kit.
E.g. for Quant 500 (XL) kit "Q500(XL)_QC1" - "Q500(XL)_QC3".
Define QC replicates, according to kit user manual.


Click Unknowns and select study samples to be analyzed with a kit, e.g. samples "2022-01" - "2022-12".
ⓘ To sort samples, click on the table's header. Samples are added to the plate in the same order as shown in the list.

- The number of samples linked with a plate is shown in brackets next to "All", e.g. 96.

- To remove samples, press Del.
- Calibration standards are not included in FIA plates.
- Reorder samples by dragging them to a new position in the selected samples list.
Find samples using metadata
ⓘ Associated section → Create kit plate layout > 4. Select samples

Example: Category "Gender" with groups "female" and "male" linked with samples, see Groups and variables
- Select the category "Gender" and a group, e.g. "female". Multiple filter options can be defined.
 Click Search.
 - Samples matching the defined filter options are shown.

Sample replicates
ⓘ Associated section → Create kit plate layout > 4. Select samples
Sample replicates can be defined during worklist generation.
Distribute replicates: select a sample and define the number of replicates distributed across a kit plate
No replicates: Apply the default values.

Plate preview
During worklist creation, a preview of all plate runs is shown.
Calibration standards are not included in FIA plates.

Export options
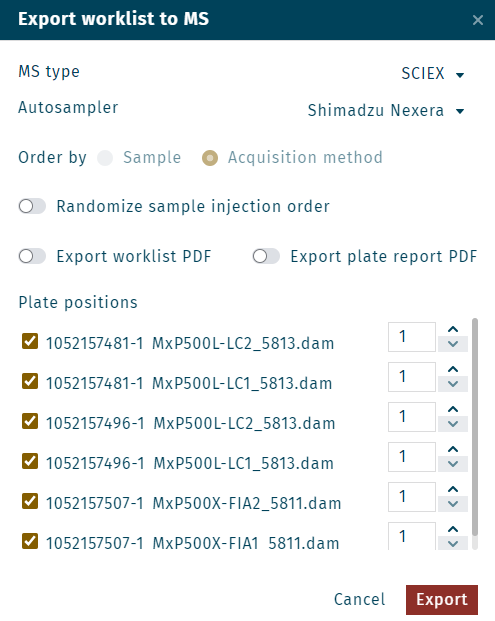
In the popup window, select the MS type and autosampler according to your instrument configuration.
| Option | Description |
|---|---|
| MS Type | Output file format for importing into MS vendor software |
| Autosampler | Defines well position format according to autosampler configuration |
| Order by | Default settings are defined in OP |
| Randomize sample injection order | Randomizes the injection order of "unknowns" in the worklist |
| Export worklist / plate report PDF | Creats PDF document of worklist / plate report |
| Plate positions | Sequences are created for selected plate runs. Define rack position in the autosampler. |
Select Export. A ZIP file is created.
![]()
"Rack type" for SCIEX OS and autosampler model "Agilent Infinity II"
| Autosampler model | Rack type |
|---|---|
| Agilent Infinity II - 1 | Multisampler 2H 2H 2B 2B 5Ref |
| Agilent Infinity II - 2 | Multisampler 2H 2H 2H 2B 5Ref |
| Agilent Infinity II - 3 | Multisampler 2H 2H 2H 2H 5Ref |
| Agilent Infinity II - 4 | Multisampler 2H 2B 2B 2B 5Ref |
| Agilent Infinity II - 5 | Multisampler 2B 2B 2B 2B 5Ref |
Exported files
The ZIP file contains the sequence for running the kit at the LC-MS system. Extract the contents onto the LC-MS operating PC. txt/csv files are generated for each kit plate run to be imported into the MS software before starting the LC-MS run.
| Instrument | Format |
|---|---|
| Analyst® | .csv |
| SCIEX OS | .csv |
| MassHunter | .csv |
| MassLynx™ | .txt |
| Xcalibur™ | .csv |
View and edit worklist
A worklist can be selected underneath the submission on the righthand sidebar.

Plate and worklist view
Select the plate run to view or edit the worklist:
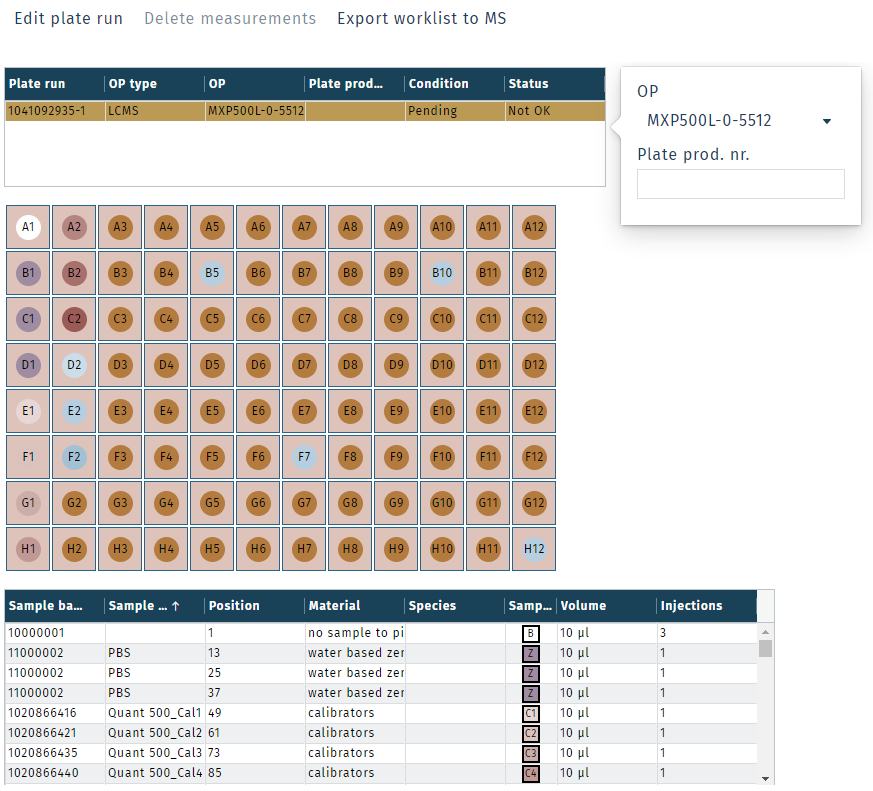
Available features
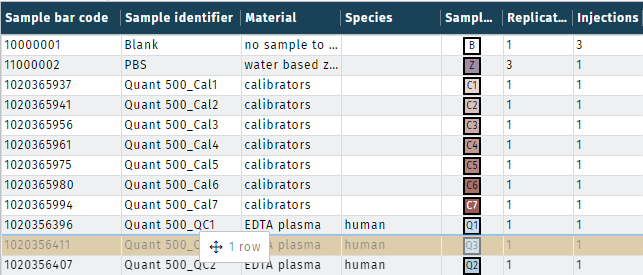
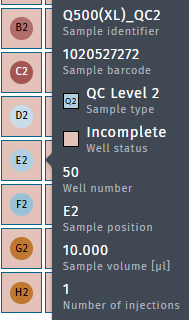
To show additional information, mouse over samples in the plate view
To copy, cut, delete, or select all, right click on samples
To insert additional samples or paste a copied or cut sample, right click on empty wells
To update sample volume added to the plate or number of injection replicates, select samples from the bottom sample list

The size and level of detail of the shown plate layout is adjustable.
![]()
![]() small size
small size
![]() sample IDs shown
sample IDs shown
![]() sample barcodes shown
sample barcodes shown
![]() large size
large size
Measure a plate run again
To measure a plate run again, either
Clone plate run
- To create a new plate run, click Clone plate run.
- Export the new sequence, using Export worklist to MS.
- Use this sequence to measure a plate run again.
Use each WebIDQ sequence export only once, received from Export worklist to MS.
A plate run is cloned by right clicking on the first plate run and selecting Clone plate run.

Define the new run number, e.g. 2.

Click Create.

Copy plate run

Select the new plate run and change the OP to the FIA OP according to the respective kit user manual, e.g. to "MXP500F-0-5813".

All kits require several plate runs, except the Bile Acids kits. Example for Quant 500 XL kit & SCIEX 5500+:
- plate run 1: LC part, e.g. OP MXP500L-0-5813
- plate run 2: FIA part, e.g. OP MXP500F-0-5813
- plate run 3: XL part, e.g. OP MXP500X-0-5813
Quantify plate run with new OP
Data linked with a plate run can be processed with another OP.
- Selct a plate run which contains quantified data, e.g. 1052001288-1. Click Clone plate run.

- Click Delete measurements and change the OP, e.g. from "MXP500L-0-8313" to "MXP500L-0-8413".

- Quantify the cloned plate run, e.g. 1052001288-2.
 Perform
Run a worklist again | Copy worklist
A worklist can be copied, consisting of multiple plate runs.
- Select a worklist.

- Click Copy worklist.

- Select a submission, where this worklist is copied to. Click Copy worklist.

- The worklist was copied. All plate runs have received new plate run numbers.

Merge plate runs | Move plate
Plate runs can be moved to one worklist.

- In LIMS > Projects select a plate run and right-click.
- From the drop-down menu, select Move plate.
- Define the worklist, where the selected plate run should be moved to.
If e.g. the LC and FIA plate runs of one kit were created in separate worklists, e.g. by Import plate run(s), use this feature to merge them.

MS data of multiple plate runs may be uploaded and imported together.